

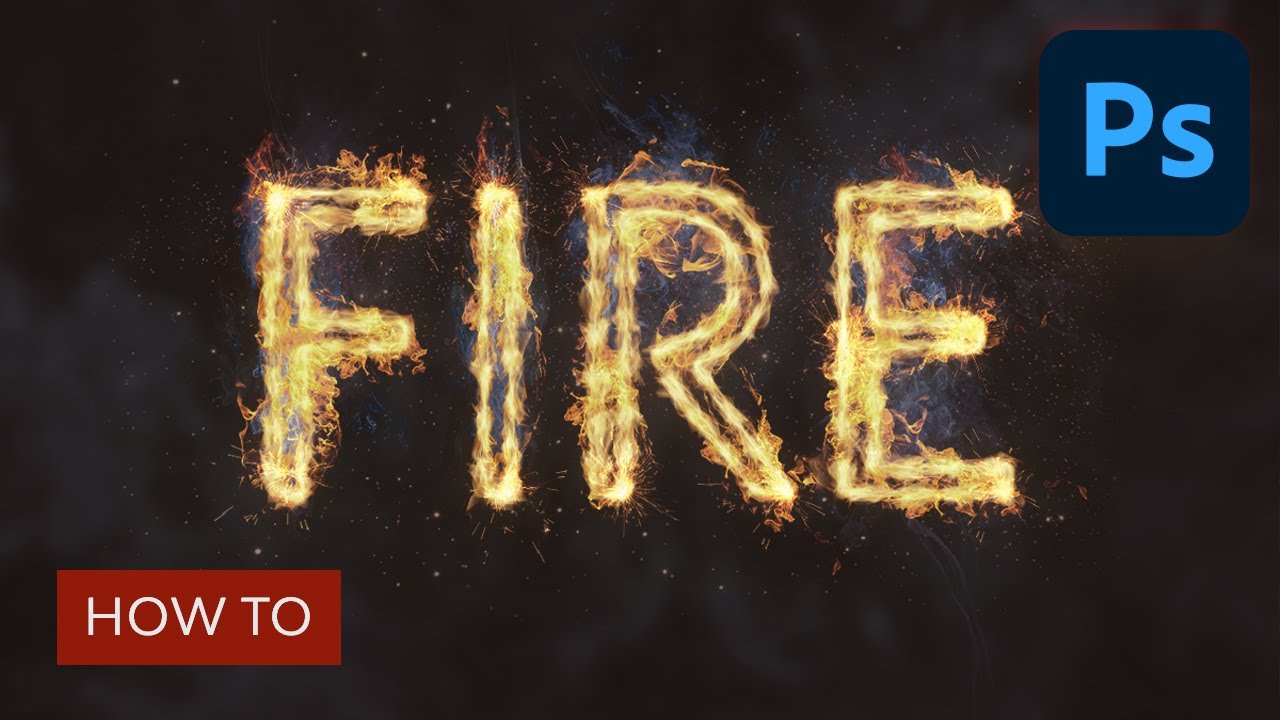
How To Do Fire Text In Photoshop
Pyrophobia is an inordinate fright or hatred of fire. This tutorial will show you how to utilize Photoshop's Flame filter, along with some flame, fume, and spark paradigm textures likewise every bit blending options, filters, and adjustment settings, to create a blazing, peppery text outcome. Let's get started!
This flaming text Photoshop effect was inspired by the many flame issue Photoshop add together-ons available on Envato Elements. For example, there is this awesome flame text effect action for Photoshop, which you tin apply to create a burn down photograph consequence or flame text result in seconds:


Additionally, if you prefer to sentry video tutorials to learn these skills, you're in luck! You can lookout this new video from the Envato Tuts+ YouTube channel to learn how to make fire in Photoshop:
What You'll Acquire in This Photoshop Flame Effect Tutorial
- How to create the background and text layers
- How to create a stroke path and layer
- How to use the flame filter
- How to create a texture overlay layer
- How to create a texture using filters
- How to adjust a layer's blending options
- How to add together flame images
- How to add together smoke images
- How to add together sparks
- How to create an outer glow
- How to add smoke to a background
- How to add a background texture
- How to utilise final adjustments
What You'll Need
The post-obit assets were used during the production of this Photoshop flaming text tutorial:
- Aller Light font
- Flames0032 Images
- Flames0036 Images
- Flames0043 Images
- Smoke Images
- Fireworks0023 Images
- Fireworks0017 Image ii - Medium
one. How to Create the Background and Text Layers
Footstep 1
Create a new 1200 x 850 px document, click the Create new make full or adjustment layer icon at the bottom of the Layers panel, choose Solid Color, and use the Color #1e100c.


Stride 2
Create the text in All Caps using the font Aller Light. Ready the Size to 350 pt and the Tracking to 100.


2. How to Create a Stroke Path and Layer
Stride 1
Right-click the text layer and choose Create Work Path.


Step 2
Hide the text layer by clicking the middle icon next to it, and create a new layer with the name Stroke Flames.


iii. How to Use the Flame Filter
Step ane
Go to Filter > Return > Flame, and click OK if you become a message telling you lot that the path is long.
Next, you'll be playing around with the dissimilar options and settings' values to stroke the path with flames, until you lot become an upshot you like.
The values used here are:
Basic
- Flame Type: 2. Multiple Flames Forth Path
- Length: 115
- Check the Randomize Length box.
- Width: 35
- Interval: l
- Check the Suit Interval for Loops box.
- Quality: High (Slow)


Advanced
- Turbulent: 35
- Jag: twenty
- Opacity: 50
- Flame Lines (Complexity): 29
- Flame Bottom Alignment: 20
- Flame Manner: 2. Vehement
- Flame Shape: 5. Pointing
- Bank check the Randomize Shapes box.
Click OK to utilize the filter. Information technology might take some fourth dimension, so just wait a little bit for it to be rendered.


Stride 2
When you like the issue, pick the Direct Selection Tool (A) and hit the Return key to get rid of the work path.


4. How to Create a Texture Overlay Layer
Stride i
Create a new layer on superlative of the Stroke Flames layer, name it Flame Texture, and make full it with White.
Brand sure to set the Foreground and Background Colors to Black and White.


Step 2
Correct-click the Flame Texture layer and choose Convert to Smart Object.


Step three
Right-click the Flame Texture layer again and choose Create Clipping Mask.


Step 4
Go to Filter > Return > Clouds.


v. How to Create a Texture Using Filters
Step 1
Go to Filter > Filter Gallery to apply the following Filters:
Sketch > Bas Relief
- Detail: 13
- Smoothness: iii
- Light: Bottom


Pace ii
Click the New event layer icon in the bottom right corner to add another filter, and apply Bas Relief with the same values again.


Step 3
Add another new effect layer.
Castor Strokes > Spatter
- Spray Radius: 10
- Smoothness: five
Click OK when done.


six. How to Adjust a Layer's Blending Options
Step i
Modify the Flame Texture layer's Blend Mode to Soft Light.


Pace ii
Double-click the Flame Texture layer to accommodate itsBlending Options. We are going to accommodate the This Layer sliders nether the Alloy If section.
Press-concur the Choice key, and click-drag the right slider to split it. As you lot move the slider'south ends, you'll find how the texture starts to blend better with the flames.
What this slider does is foreclose the lighter areas of the texture from interacting with the content beneath it.


Step iii
Try different values until you like the outcome.
We will get back to the texture at the finish of the tutorial to blur it, so you can also modify the values some more then.


7. How to Add together Flame Images
Footstep ane
Use whatever of the flame images from the Flames0032, Flames0036, and Flames0043 sets to add together to the text.
Information technology is ameliorate to add the images every bit Smart Objects so that you can apply changes to them non-destructively.
To do so, go to File > Place Linked, and open the image yous want to add.


Stride two
Change the image layer's Blend Mode to Screen.


Step 3
Printing Command-T to enter the Free Transform Mode, and motion, resize, and rotate the epitome to place it over a role of the text.
Hit the Return key to commit the changes.


Step 4
Go to Prototype > Adjustments > Hue/Saturation, and change the Hue to iiiand the Saturation to -35, or utilise any other values to match the color of the epitome'south flame with the stroke's flame colour.


eight. How to Add More Flames
Step 1
Place another flame image over another function of the text, change its layer'south Blend Manner to Screen, and transform information technology as needed.
To duplicate the adjustments, aggrandize the commencement flame prototype layer's filter list, press-concur the Option central, and click-elevate the Smart Filters tab to the newly added image layer.


Step 2
Repeat the steps to add as many flame images as needed to the text.


Step three
Place all the flame paradigm layers in a group and name it Flames.


9. How to Add Low-cal Fume Images
Pace 1
Add together any of the fume images you similar as a Smart Object, and change its layer's Blend Way to Screen.
Identify the fume image over a function of the text, and transform information technology as needed.


Step 2
Press Command-U to accommodate the Hue/Saturation. Check the Colorize box, and alter the Hue to 215, the Saturation to 25, and the Lightness to -60.


Pace three
Double-click the smoke image layer to adapt its Blending Options. This time, we are going to conform the Underlying Layer sliders under the Blend If section.
Printing-concur the Pick key, and click-drag the right slider to split it. Equally you motion the slider'due south ends, you'll notice how the smoke epitome starts to blend improve with the text and the background.
What this slider does is protect the lighter areas of the text from being affected past the smoke texture.


Step 4
Right-click the smoke image layer and choose Copy Layer Fashion.


Step five
Add more fume images to the text, and for each new prototype y'all add, correct-click its layer and choose Paste Layer Style.
You tin can besides duplicate the Hue/Saturation adjustments the aforementioned way you duplicated them for the flame images.
Double-click the Hue/Saturation tab under the Smart Filters list to utilize unlike values depending on the image you add together and the effect you lot want.
Repeat the same steps until you similar the upshot.


Stride 6
Place all the fume image layers in a grouping and name it Smoke, and change the group'south Opacity to 85%, or whatsoever value you lot like.


10. How to Add together Heavy Smoke Images
Step 1
We are going to add together more fume images to create more depth.
So add a new fume prototype, alter its layer's Blend Mode to Lighter Color, place it over whatsoever role of the text, and transform it as needed.


Footstep 2
Add together a few more fume images using the aforementioned Alloy Mode, and keep them a niggling flake smaller than the lighter ones.


Step 3
Identify all the new fume image layers in a group and name it Smoke 02, and modify the group'due south Opacity to 50%, or whatever value you similar depending on the result you want.


11. How to Add Sparks
Stride 1
Place i of the Fireworks0023 images over whatsoever part of the text, change its layer'southward Blend Mode to Linear Dodge (Add), and transform it as needed.


Pace 2
Repeat the same steps to add more sparks all over the text.


Pace iii
Place all the spark epitome layers in a group and proper noun information technology Sparks.


12. How to Create an Outer Glow
Step one
Press-hold the Option key, and click-drag the Stroke Flames layer downwards to create a copy below the original.


Step 2
Rename the re-create layer to Glow, right-click it, and choose Convert to Smart Object.


Step 3
Go to Filter > Mistiness > Gaussian Blur, and set the Radius to 25.


Step 4
Alter the Glow layer's Alloy Style to Hard Low-cal and its Opacity to 25%.


13. How to Add together Fume to a Background
Step 1
Identify a new smoke image on acme of all layers and modify its layer'due south Alloy Manner to Screen.
Resize the image to fill up 1 side of the certificate.


Step 2
Press Command-U to arrange the Hue/Saturation. Check the Colorize box, and change the Hue to 215, the Saturation to 25, and the Lightness to -83.
Keep in mind that these values are the ones used in the tutorial, but you tin e'er tweak them to conform your piece of work and images.


Step three
Go to Filter > Blur > Gaussian Mistiness, and set the Radius to six. The aim here is to create a subtle foggy upshot all effectually the text.


Step four
Repeat the aforementioned steps to add a couple more smoke images.


Step five
You tin can also add some more behind the text.


14. How to Add a Background Texture
Step 1
Place the Fireworks0017 - Image ii texture on height of the Solid Color layer, and change its layer's Alloy Mode to Linear Dodge (Add) and its Opacity to fifty%.
Transform the texture as needed to fill up the groundwork.


Step 2
If you want to get rid of whatever parts of the texture, click the Add together layer mask icon at the lesser of the Layers panel, and make certain to select the mask's thumbnail.


Step three
Set the Foreground Color to Blackness, pick the Brush Tool, and choose a soft round tip. Paint over any areas yous want to erase.


15. How to Apply Final Adjustments
Step i
Click the Create new fill or adjustment layer icon at the bottom of the Layers panel and choose Color Lookup.
Choose FoggyNight.3DL from the 3DLUT File bill of fare, and change the layer's Opacity to 10%.


Step two
Select the Flame Texture layer, and go to Filter > Blur > Gaussian Blur and set up the Radius to three then that the texture is not as harsh.


Congratulations! Your Fire Text Effect Is Done
In this tutorial, we created a text work path and stroked it with flames using the Flame filter. And so, we started adding flame, smoke, and spark image textures to build upwards the upshot. We besides used blending options, filters, and adjustments to improve alloy everything together. Finally, nosotros added the groundwork and some finishing touches to finish off the effect.


v Top Photoshop Flaming Text Effects and Actions From Envato Elements
At present you know how to make burn down in Photoshop and how to create the coolest flame text. Now, if you want to save some time next fourth dimension you lot want to make a flame upshot Photoshop design, you need top add-ons.
If y'all're an avid Photoshop user, you lot'll love Envato Elements. The subscription-based marketplace offers you unlimited Photoshop add-ons, Photoshop flame furnishings, premium fonts, stock photos, and more than!
Here's our selection of the best flame effect Photoshop actions, brushes and add together-ons. Try them for your next projection!
1. Creative Fire Text Upshot (PSD)
Want to create cool Photoshop flaming texts in minutes? Check out this add-on. The download includes a PSD file with a holographic smart object in HD (4000x2500 pixels).
This Photoshop text burn effect is easy to use, non-subversive, and well-organized in layers.
2. Artistic Flame Text Effect (PSD)


If you like to have more than variety in your Photoshop flame text design, this download includes three styles. Only like the previous i, this is a Photoshop text fire result worth having. The result is fully editable, and information technology'south easy to employ.
iii. Toxic Flame Text Issue (PSD)


What if you're looking for dissimilar types of Photoshop flame effects? Then this one is for you.
This cool Photoshop flame text effect replicates fire with acrid chemicals for a dissimilar look. Yous can suit the colors equally y'all wish: multicolor, monotone, gradients, or more!
4. Burn down Effect Photoshop Brushes (ABR)


Sometimes you just need a realistic set of fire upshot Photoshop brushes. This pack is perfect for creating digital art, photo furnishings, overlays, and more than. Try these brushes for a realistic fire text effect!
5. Burn Outcome Photoshop Action (ABR, ATN)


This Photoshop flame outcome action is another great addition to your drove. Information technology's really easy to use. Y'all merely need to brush over your design where you want the flame result and play information technology. You could create crawly flaming text Photoshop designs with this pack of non-destructive actions and brushes!
Explore More Photoshop Tutorials and Resources
Looking to learn more than? Check out these awesome fire effect and Photoshop tutorials:
Editorial Note: This postal service has been updated with contributions from Maria Villanueva. Maria is the Associate Editor of the Tuts+ Pattern channel.
Source: https://design.tutsplus.com/tutorials/pyrophobia-inspired-fiery-text-effect--cms-29688
Posted by: howardsuptand.blogspot.com
0 Response to "How To Do Fire Text In Photoshop"
Post a Comment